What Is HTML?
Hyper Text Markup Language instructs a website on how to display its content. Although it can seem confusing at first, it is quite simple.
The images below show how to access HTML in the developer center and what the subsequent pop-box looks like. When working with the HTML, you will do so within this pop-up.
Edovate subscribes to an HTML Source Editor, and we highly suggest you use this site to write your content. It allows you to see both versions side-by-side, allowing you to work in either box. Copy the HTML side content and paste it within the developer center when ready.
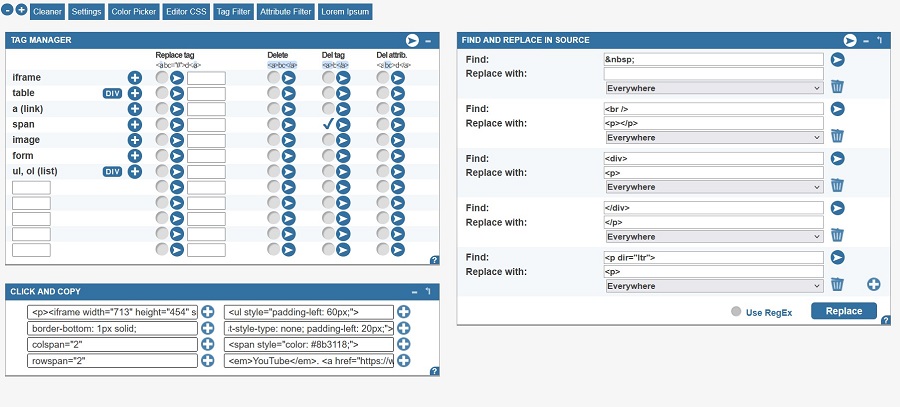
Click on the top button (indicated below) to load saved content from the cloud. Then, click to Open the content saved as #1.

The bottom of your editor screen should now look like this.
IMPORTANT: Do not save anything within the HTML editor. These settings are saved and will affect everyone who utilizes this tool.
Use the following instructions to adhere to our Style Guide when creating and, more importantly, editing content.
Clean Up
When content is copied and pasted from another location, it always contains hidden HTML that needs to be removed. The first image below shows several common transgressions, and the second shows corrected content. Review how to resolve each.
Remove the following tags: <div>, </div>, <span>, and </span>.
Replace <p dir=”ltr”> with <p>. Replace <br /> with </p><p>. Replace (which stands for non-breaking space) with a space (tap the space bar).
Bold and Italics
The easiest way to add italics or bold is with the B and I buttons. This appears in the HTML as <em> </em> for italics and <strong> </strong> for bold.
Sometimes, a single word or phrase will be broken up with extra tags. Remove these so that only the opening tag (<em>) and closing tag (</em>) remain.

Indentation
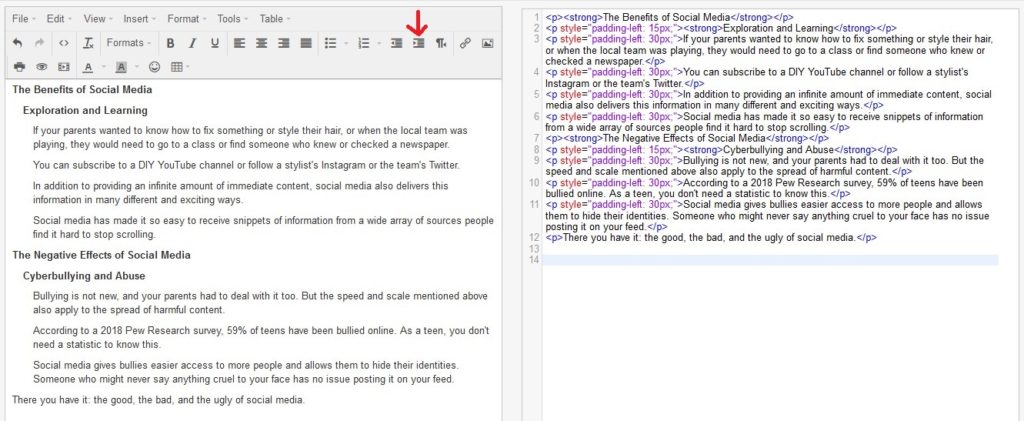
Using the indent button will move the content in by 40px. Adjust this to 30px. If you want to create a tier of indented content, like the example below, adjust the <p style=”padding-left: 30px;”> tag as needed.
Numbered Lists
Click on the option to create a numbered list. A series of tags are required. The main tags to generate the list are <ol> and </ol>. Each entry within the list needs <li> and </li>.
Sometimes, the content is light enough to leave the list as is (first image). Other times, you will want to add white space between the numbered entries (second image) or additional information (third image).
Alter the starting number of a list with this tag: <ol start=”2″>. Use a 40px padding to indent content that will match the numbered list.
Bullets
Click on the option to create a bulleted list. Use default for questions and circle for everything else.
A series of tags are required, beginning with <ul> and ending with </ul>. Each entry has the <li> and </li> tags. Bullets pad at 30px. If adding a bullet within indented content, adjust the padding to 60px.
When adding a list of outside resources, adjust the bullet tag to eliminate the circle and the padding to 20px with <ul style=”list-style-type: none; padding-left: 20px;”>.
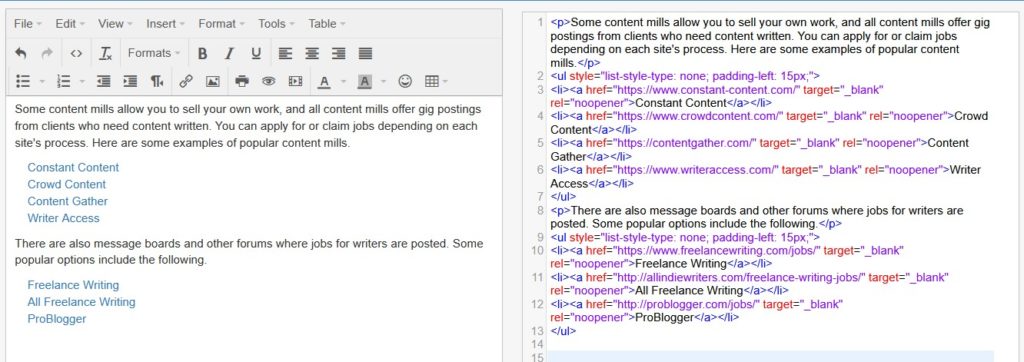
Copy and pasted content often includes extra coding that must be removed.

Tables
Tables are your best friend. Use them.
Click to insert a table and select the number of rows and columns. You can alter this within the HTML as you create the table.
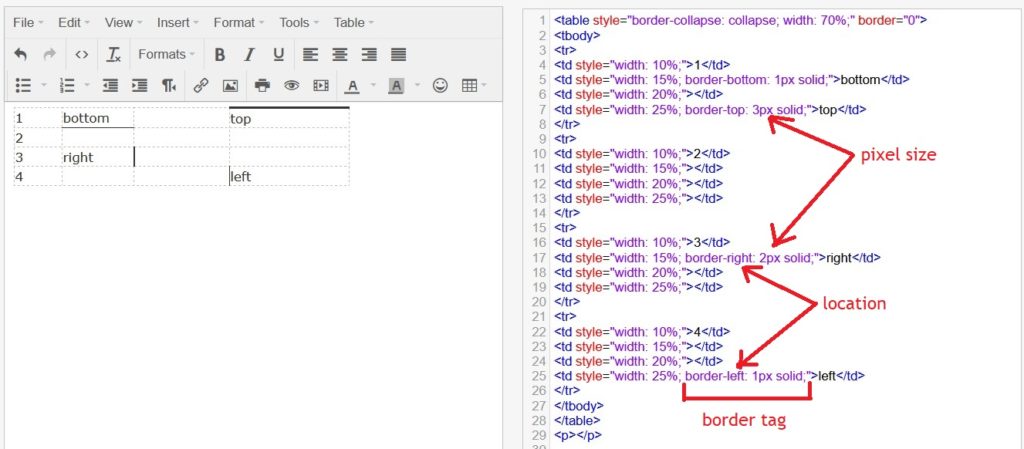
Within the <table> </table> tags are <tr> </tr> tags, which indicate a single column, and <td> </td> tags which indicate a single row. The width of these rows can be altered but must add up to the total width of the table, which cannot exceed 100%.
Changing the border size to 0 removes the boundary lines around the table.
Individual borders can be added with varying pixel sizes, which is very helpful for equations.
Columns and rows can be merged with the rowspan and colspan tags, respectively. The number in quotation marks indicates how many columns or rows to merge. The corresponding <td> </td> tags must be removed.
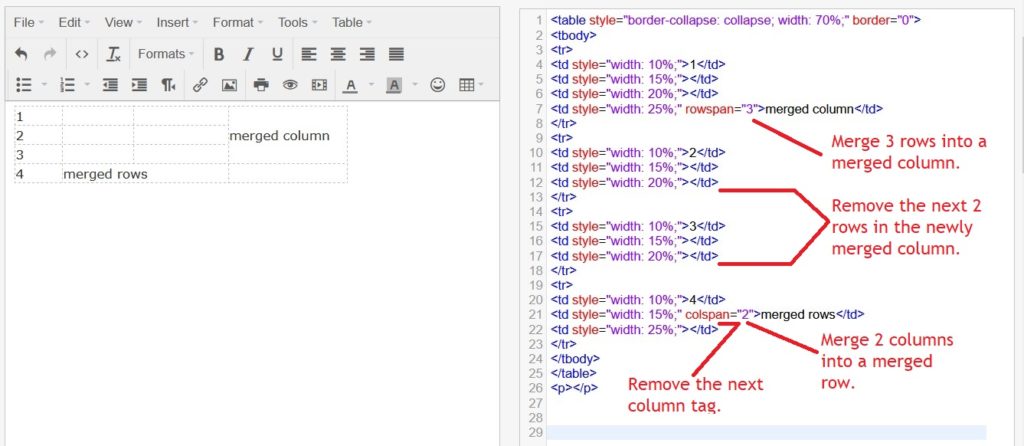
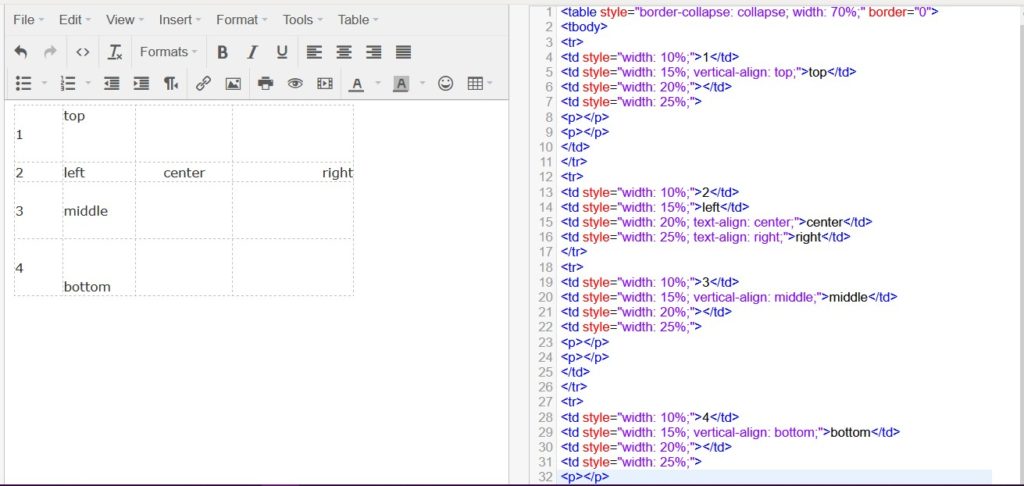
Text will automatically align to the left and the middle of each cell. It can be altered with text-align and vertical-align tags.
Tables are necessary to align equations properly, as shown in the first few images below. Review the other images to see how tables allow for the creation of columns, the padding of embedded videos and images, and other visual organization of content.
